Framing Brutal Art - Floating frames
Brutalism, the architectural movement has come and gone. Remember those grand concrete buildings of the 1990's, that are being pulled down as eyesores all over the world?
However, brutalism might offer a solution to a framing problem i have been having with my waterfall pictures. Put simply, ordinary frames don't match my compositions: my falls are of rock and broken ground, and do not look good gentrified behind glass. To add to the problems, they are odd shapes and do not fit ready made items.
So, i spoke to a couple of people who i trust, and here is their advice:
1. Don't bottle up the water in frame edging. Let it pour off the edge of the image into air.
2. Look around. Choose something that resonates with rocks and trees and water.
3. Dont be frightened to do something different.
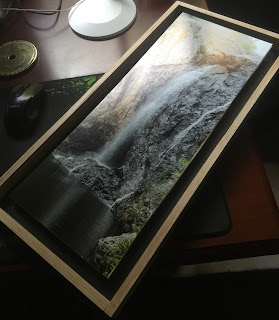
I choose a raw wood floating frame, with visible chisel marks and exposed (rusty) nail heads.
1. i nailed a simple frame of DAR leaving 2cm free around each edge and (light) back board. There is nothing nice about the frame - all the workings are exposed, like the fall.


2. i cut a light wood support for the photo and then glued the photo to the support using acid free spay adhesive. I cut the support free hand, leaving errors in place. (if you want something less brutal, cut square a fraction under the size of the photo and when attached - trim and meld photo edge in with a safe wood sealant. Here, checking photo for fit before adhering to support.

3. i cut lifts and inserted a black card into the back recess of the frame. I glued the lifts in place and then glued the photo support into place.


Too brutal?
I have framed a much larger version of this print to test the scalability of the frame. There are a couple of significant differences here - particularly wieght (4 times as heavy) and visual impact. While i increased the 'margins' sightly the separation of image and frame is not as great (suggesting a longside:margin ration of 20:1 might give better visual separation). Because of the size, i fore-went some of the brutal features in favor of greater structural support (i kept the nails but set the back into the frame rather than outside it.
This photo print is double the size of the first.

Too explore this a little further, i have printed 2 new images with a 8 by 10 ratio, and have create a 'tight frame. i will progressively trim the images until they fit


So, i spoke to a couple of people who i trust, and here is their advice:
1. Don't bottle up the water in frame edging. Let it pour off the edge of the image into air.
2. Look around. Choose something that resonates with rocks and trees and water.
3. Dont be frightened to do something different.
I choose a raw wood floating frame, with visible chisel marks and exposed (rusty) nail heads.
1. i nailed a simple frame of DAR leaving 2cm free around each edge and (light) back board. There is nothing nice about the frame - all the workings are exposed, like the fall.


2. i cut a light wood support for the photo and then glued the photo to the support using acid free spay adhesive. I cut the support free hand, leaving errors in place. (if you want something less brutal, cut square a fraction under the size of the photo and when attached - trim and meld photo edge in with a safe wood sealant. Here, checking photo for fit before adhering to support.

3. i cut lifts and inserted a black card into the back recess of the frame. I glued the lifts in place and then glued the photo support into place.


Too brutal?
I have framed a much larger version of this print to test the scalability of the frame. There are a couple of significant differences here - particularly wieght (4 times as heavy) and visual impact. While i increased the 'margins' sightly the separation of image and frame is not as great (suggesting a longside:margin ration of 20:1 might give better visual separation). Because of the size, i fore-went some of the brutal features in favor of greater structural support (i kept the nails but set the back into the frame rather than outside it.
This photo print is double the size of the first.

Too explore this a little further, i have printed 2 new images with a 8 by 10 ratio, and have create a 'tight frame. i will progressively trim the images until they fit
Here both images have been seated in the frame, ready to be trimmed. For test purposes, i then trimmed each frame until i arrived at a point i was happy with


Here the final dimensions were 50cm by 40cm (20" by 16") for the photo and gap around the photo is 2cm (3/4"). The longside:margin ratio of 20:7.5 is still smaller than i thought i would get to. Perhaps the visual impact has more to the longside/short side ratio of the original work.
Here the final dimensions were 50cm by 40cm (20" by 16") for the photo and gap around the photo is 2cm (3/4"). The longside:margin ratio of 20:7.5 is still smaller than i thought i would get to. Perhaps the visual impact has more to the longside/short side ratio of the original work.
Update May 2021
Framing is intended to be forever - fames that just last a year are worthless. So I went back and checked each of the initial ten I made this wayA couple had been onsold and i couldn't access them. All the others seemed to be structurally sound (I chose DAR as being fairly stable). I wondered originally whether a weakness was that the structure lends itself to spider webs and dust collection, but none seemed to be suffering.
With the largest of the frames - which I have kept - I found that the photographic media was detaching from the board :( Easily fixed, but I guess one has to be very careful with the initial application and cure temperature.


Comments
It unites the picture and frame, making it one solid piece of art, rather than "a framed photo".
This one has already left the building - I am in the process of building a couple more for displays/sale in galleries but plan on keeping a couple. Next one is for a 36" by 18" version of this image.
These really suit scenes where you do not want a visual container or do not want to use glass.
I'm actually very excited that one of my comments actually worked. Happy dance here.
On the whole it looks splendid.
Thanks mate!
Here the black area is to create a sense of separation from what ever else might distract on a wall. I think it needs more black - perhaps 2* or maybe more :)
Thanks !
My mother insisted that the water not be hemmed in by a border :)